App installieren
So wird die App in iOS installiert
Folge dem Video um zu sehen, wie unsere Website als Web-App auf dem Startbildschirm installiert werden kann.
Anmerkung: Diese Funktion ist in einigen Browsern möglicherweise nicht verfügbar.
Du verwendest einen veralteten Browser. Es ist möglich, dass diese oder andere Websites nicht korrekt angezeigt werden.
Du solltest ein Upgrade durchführen oder einen alternativen Browser verwenden.
Du solltest ein Upgrade durchführen oder einen alternativen Browser verwenden.
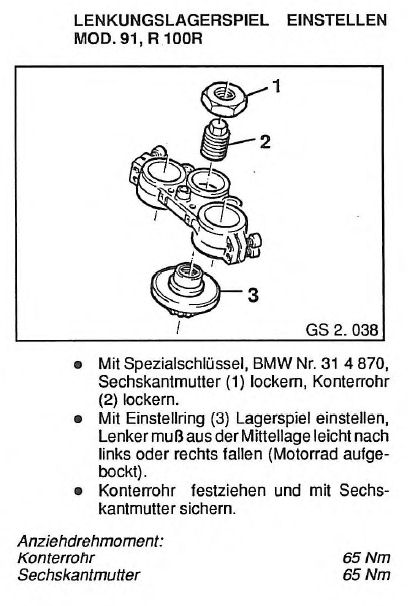
Lenkkopflager mit Drehmomentschlüssel einstellen
- Ersteller Funker
- Erstellt am
Ist doch hier alles beschrieben: 


Was im WHB steht, ist ja das von BMW vorgegebene Verfahren.
An meiner GS II hab ich das auch schon entsprechend gemacht.
Woher kommt denn deine Methode?
An meiner GS II hab ich das auch schon entsprechend gemacht.
Woher kommt denn deine Methode?
Zuletzt bearbeitet:
??
Kontrollier mal bitte deinen Browser, man kann nichts lesen (ausser uns Admins).
Warum nutzt du ein WHB einer 1100RS?
Hans
Warum nutzt du ein WHB einer 1100RS?
Hans
[h=2]Lenkkopflager - Schwierigkeiten bei der Einstellung[/h]
[TD="width: 400"](Anmerkungen von mir)[/TD]
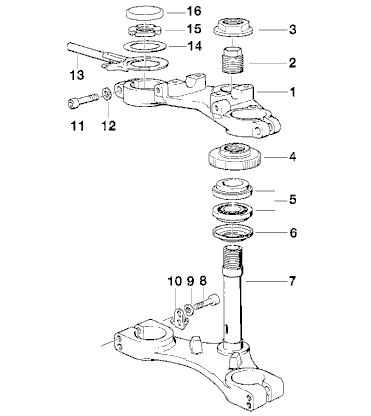
[TD="width: 400"]er erwähnt übrigens, daß diese Anleitung ein Service-Bulletin von BMW ist, die offenbar nach Drucklegung des WHB kam links die Abbildung daraus
diese ersten Schritte sind nur deswegen erforderlich, weil man sonst an die Schraube #2 oder #3 nicht mit dem Drehmo rankommt.
Wenn man ( so wie ich es im Endeffekt getan habe ) die Einstellmutter #4 (in den Abbildungen weiter oben andere Nummer!) "nach Gefühl" anzieht, und die Prüfung der Vorspannung wie oben im WHB beschrieben vornimmt (Lenker ist "ganz leicht schwergängig"), dann kann der Lenker drauf bleiben!
[/TD]
[TD="width: 400"]ich habe ein paar Prellschläge von unten auf die Gabelbrücke gegeben, damit sie sich löst (was aber nicht ganz genügt hat, s.u. )[/TD]
[TD="width: 400"]diese Markierung ist m.M. nur eine Kontrolle, um wieviel man nun nachgedreht hat. Statt Klebeband gehen genauso gut oder besser auch zwei Farbkleckse.[/TD]
[TD="width: 400"]jetzt kommt "der Ring" zum Einsatz:

 auf dieses Anziehen über den Drehmo habe ich verzichtet, sondern "nach Gefühl" (siehe dazu auch unten zum
Problem
, was mir begegnete)
auf dieses Anziehen über den Drehmo habe ich verzichtet, sondern "nach Gefühl" (siehe dazu auch unten zum
Problem
, was mir begegnete)
[/TD]
[TD="width: 400"]siehe oben betr. der Markierung [/TD]
[TD="width: 400"]hier kann man jetzt mit Hilfe der Markierungen prüfen[/TD]
[h=3]Und nun zum Problem, welches ich dabei hatte:[/h]
Auslöser war ein "Shimmy", den ich bislang noch nie hatte - egal welche Reifen und egal wie abgefahren. Zuerst habe ich das fälschlicherweise auf die zu dem Zeitpunkt montierten härteren Gabelfedern zurückgeführt.
| 
|
 | 
|
| [h=3]Zitat aus der Anleitung von Anton[/h] |
|
|
|
|
|
|
[TD="width: 400"](Anmerkungen von mir)[/TD]
[TD="width: 400"]er erwähnt übrigens, daß diese Anleitung ein Service-Bulletin von BMW ist, die offenbar nach Drucklegung des WHB kam links die Abbildung daraus
diese ersten Schritte sind nur deswegen erforderlich, weil man sonst an die Schraube #2 oder #3 nicht mit dem Drehmo rankommt.
Wenn man ( so wie ich es im Endeffekt getan habe ) die Einstellmutter #4 (in den Abbildungen weiter oben andere Nummer!) "nach Gefühl" anzieht, und die Prüfung der Vorspannung wie oben im WHB beschrieben vornimmt (Lenker ist "ganz leicht schwergängig"), dann kann der Lenker drauf bleiben!
[/TD]
[TD="width: 400"]ich habe ein paar Prellschläge von unten auf die Gabelbrücke gegeben, damit sie sich löst (was aber nicht ganz genügt hat, s.u. )[/TD]
[TD="width: 400"]diese Markierung ist m.M. nur eine Kontrolle, um wieviel man nun nachgedreht hat. Statt Klebeband gehen genauso gut oder besser auch zwei Farbkleckse.[/TD]
[TD="width: 400"]jetzt kommt "der Ring" zum Einsatz:
auf dieses Anziehen über den Drehmo habe ich verzichtet, sondern "nach Gefühl" (siehe dazu auch unten zum
Problem
, was mir begegnete)[/TD]
[TD="width: 400"]siehe oben betr. der Markierung [/TD]
[TD="width: 400"]hier kann man jetzt mit Hilfe der Markierungen prüfen[/TD]
- Zitat Anton: Unfortunately, the reality is that the knurled adjuster will often be frozen to the top clamp by corrosion, requiring complete disassembly of the upper steering head components.
- genau so war's bei mir auch:
[TD="width: 59%"]
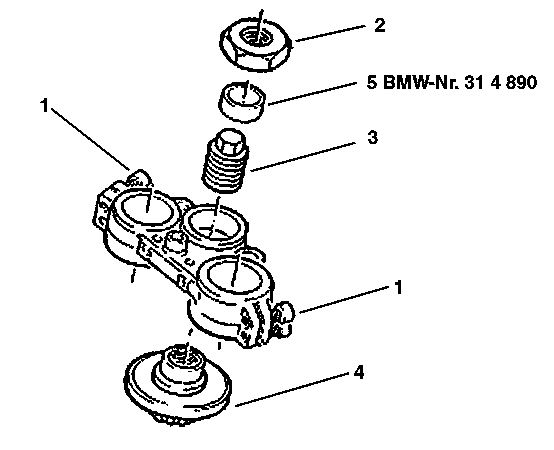
- die "Baugruppe", die aus den Teilen 2, 3 und 4 plus dem "Ring" hergestellt wurde, hat sich auch bei großer Kraft nicht gerührt. Der Ring war schon leicht verformt (gequetscht).
- Ursache: Kontaktkorrosion zwischen der oberen Gabelbrücke #1 und #4. Habe dort Caramba gesprüht und kräftige Prellschläge von unten gegen die Gabelbrücke gesetzt - nix.
- Dann habe ich noch den Heißluftfön gezückt, und die Gabebrücke erwärmt. Immer noch nix. Dann statt Prellschläge über ein Hartholz ebensolche über ein Stahlstück ... irgendwann ging's. Allerdings äußerst schwergängig! An eine kontrollierte Drehmomentmessung (von oben her) wäre überhaupt nicht zu denken gewesen: insofern war ich froh, daß ich den Lenker drangelassen habe.
- Ich habe dann in 5-10°-Schritten weiter angezogen, gegen immer noch erheblichen Widerstand durch die Korrosion zwischen Einstellmutter und oberer Gabelbrücke. Jedesmal dazwischen die "Gängigkeit" der Lenkung durch "Hin-und-her" geprüft, solange, bis eine "ganz leichte Schwergängigkeit" spürbar war. So hat sich das auch damals von ~10 Jahren bei der ersten Durchsicht der neu gekauften Basic angefühlt (kann ich mich erinnern).
[TD="width: 41%"] [/TD]
[/TD]
- Hätte ich übrigens das ganze zu stark angezogen, wäre also die Lenkung gefühlt "zu schwer" gegangen, dann hätte ich ein echtes Problem gehabt: wie wieder losdrehen? Denn beim Lösen der Verschraubung hat sich sofort die "Baugruppe" rechts ⇨ aus der Einstellmutter gelöst - anstatt diese mitzunehmen und zu lösen. Dann hätte ich wirklich die obere Gabebrücke abnehmen und das ganze entrosten müssen.
- Insgesamt hat sich so ein Drehwinkel der Einstellmutter von 80-90° (geschätzt) ergeben - war schon ganz schön viel nachzustellen.
- diesen Ring (di=22, da=24.55 und L 10 mm, aus hartem Material) braucht man, v.a. dann, wenn Kontaktkorrosion zwischen der oberen Gabelbrücke und der Rändelmutter vorliegt. Wenn dies nicht der Fall ist, kann man vermutlich die Rändelmutter mit der bloßen Hand drehen (falls sie zu locker ist).
- nach Drehmoment muß man nicht unbedingt vorspannen.
Wie gesagt: maßgeblich ist das WHB für die R100R.
Auch wenn die Gabel der K1100RS ähnlich sein mag, sind dort beschriebene Verfahren für dein Motorrad nicht relevant.
Nächstens kommt noch einer mit Beschreibungen für die R32.
Auch wenn die Gabel der K1100RS ähnlich sein mag, sind dort beschriebene Verfahren für dein Motorrad nicht relevant.
Nächstens kommt noch einer mit Beschreibungen für die R32.
JIMCAT
Urgestein
Na ja, "verbrochen" hat dies ja unser Gerd -Zeebulon auf seinen Seiten. ")
https://www.zeebulon.de/Mot/bmw_r80gs.htm#Lenkkopflager
https://www.zeebulon.de/Mot/bmw_r80gs.htm#Lenkkopflager
gelöscht, da Nonsense geschrieben.
Hans
Hans
Zuletzt bearbeitet:
FrankR80GS
Dauertester
- Seit
- 30. Dez. 2014
- Beiträge
- 7.183
hg_filder;[URL="tel:1370937" schrieb:1370937[/URL]]Kontrollier mal bitte deinen Browser, man kann nichts lesen (ausser uns Admins).
Warum nutzt du ein WHB einer 1100RS?
Hans
Hallo Hans, mit Safari für iOS habe ich keinen Zugriff auf die erste Seite des Threads. Erste Seiten anderer Threads gehen und auch die zweite Seite des Threads geht. Mit Duckduckgo für iOS geht es eingeschränkt. Kann mich nicht erinnern, dass schon gehabt zu haben.
/Frank
Hallo Hans, mit Safari für iOS habe ich keinen Zugriff auf die erste Seite des Threads. Erste Seiten anderer Threads gehen und auch die zweite Seite des Threads geht. Mit Duckduckgo für iOS geht es eingeschränkt. Kann mich nicht erinnern, dass schon gehabt zu haben.
/Frank
Hast du die Möglichkeit, den Cache zu leeren? Hatten wir intern die Tage mal. Am Forum selber wird gerade nichts gemacht.
Hans
FrankR80GS
Dauertester
- Seit
- 30. Dez. 2014
- Beiträge
- 7.183
Hast du die Möglichkeit, den Cache zu leeren? Hatten wir intern die Tage mal. Am Forum selber wird gerade nichts gemacht.
Hans
Hallo Hans, Danke, gemacht! Nützt aber nichts.
Ein "refresh", also neu laden der Seite behebt den Fehler einmalig. Wahrscheinlich ein Bug im Browser - mal sehen.